In the previous step, you added the markup for the events calendar placeholder. Now you can add the jQuery script to initialize the widget. Then add some options to customize the events calendar.
- After the closing
</div>tags you added in the previous step, enter the following jQuery script to initialize the wijeventscalendar widget:<scripttype="text/javascript"> $(document).ready(function () { $("#eventscalendar").wijevcal(); }); </script> - Customize the wijeventscalendar by setting options to determine the time intervals that will appear. The options you will be setting are describe in the following table:
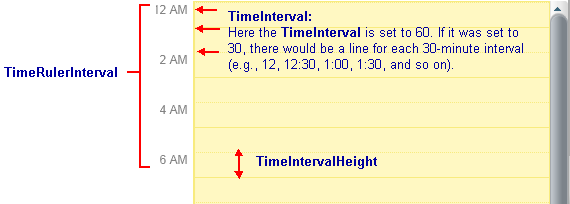
Option Value Description timeInterval 60 This option specifies the time interval for the Day view, in minutes. timeIntervalHeight 25 This option specifies the Day view time interval row height, in pixels. timeRulerInterval 120 This option specifies the time ruler interval for the Day view, in minutes. Add these options to the script, which should now look like the following:
<scripttype="text/javascript">
$(document).ready(function () {
$("#eventscalendar").wijevcal({
timeInterval: 60,
timeIntervalHeight: 25,
timeRulerInterval: 120
});
});
</script>
The following image shows the differences between the time interval options.
